
Installing GitHub Repo Template Updates

Tell me if this sounds familiar…
You spawn a project with a GitHub repo template. Maybe it’s yours, maybe it’s somebody else’s, doesn’t matter. But at some point, the author of the template releases a new version expressing bug fixes or interesting new features.
Meanwhile: you have moved on. You’ve added a ton of your own code, maybe already fixed some of those bugs, and your project’s code base has diverged sigificantly from the original template.
So how do you incorporate the changes in the template update?
TL/DR: Do this. {: .notice–info}
Here’s a simple example. I have a NextJS project template I am currently using in several different projects. Every time I think up a new feature in one of those projects, I add it to the template. I’d like to find an efficient method for getting those changes out to the other projects that depend on that template.
One obvious strategy is to work through the commit list and evaluate whether it makes sense to incorporate each given commit into the target project. In fact, that may be the ONLY strategy… a template is just a starting point, after all, and each project will rapidly diverge and become its own unique flower.
But try it. Flipping back and forth between the GitHub commit list and VS Code is just cumbersome. There has to be a better way, right?
CLI Wizard Version: git difftool
Meet git difftool.
Briefly, git diff is a command that lets
you visualize and selectively merge the diff between two git commits, including
the ones at the head of a working tree. And git difftool lets you run
git diff using a third-party tool. Like, for example, VS Code.
Fair Disclosure: I’m opinionated in favor of VS Code. If you want to leave out the VS Code-specific parts below, you’re on your own. {: .notice–info}
So here’s the strategy in a few simple steps:
-
If you haven’t already done so, set VS Code up as your Git editor. To do that, run:
git config --global core.editor "code --wait"NOTE: if you’re running Windows, you should have selected Add to PATH during your VS Code installation. If you didn’t, fix that.
-
Set VS Code up as your default
difftool. To do that, entergit config --global -ein your terminal to bring up your globalgit.config. Then add these lines:[diff] tool = default-difftool [difftool "default-difftool"] cmd = code --wait --diff $LOCAL $REMOTE -
Go get the repo URL (
<template-repo-url>) and branch name (<template-remote-branch>) of the template you want to diff against. Add a new remote to that template branch your local git repo and fetch its state. Your primary remote is probably calledorigin. Let’s call this onetemplate. In your terminal:git remote add template <template-repo-url> -t <template-remote-branch> -f -
Create a new branch in your local repo (let’s call it
template) that will track this remote. In your terminal:git branch template --track template/<template-remote-branch> -
Check out the local branch you want to diff against the template and run this:
git difftool template
When you perform that last step, your terminal will present you the names of changed files one at a time and ask if you want to open them. If you do, you will see a diff view like this in your VS Code editor:
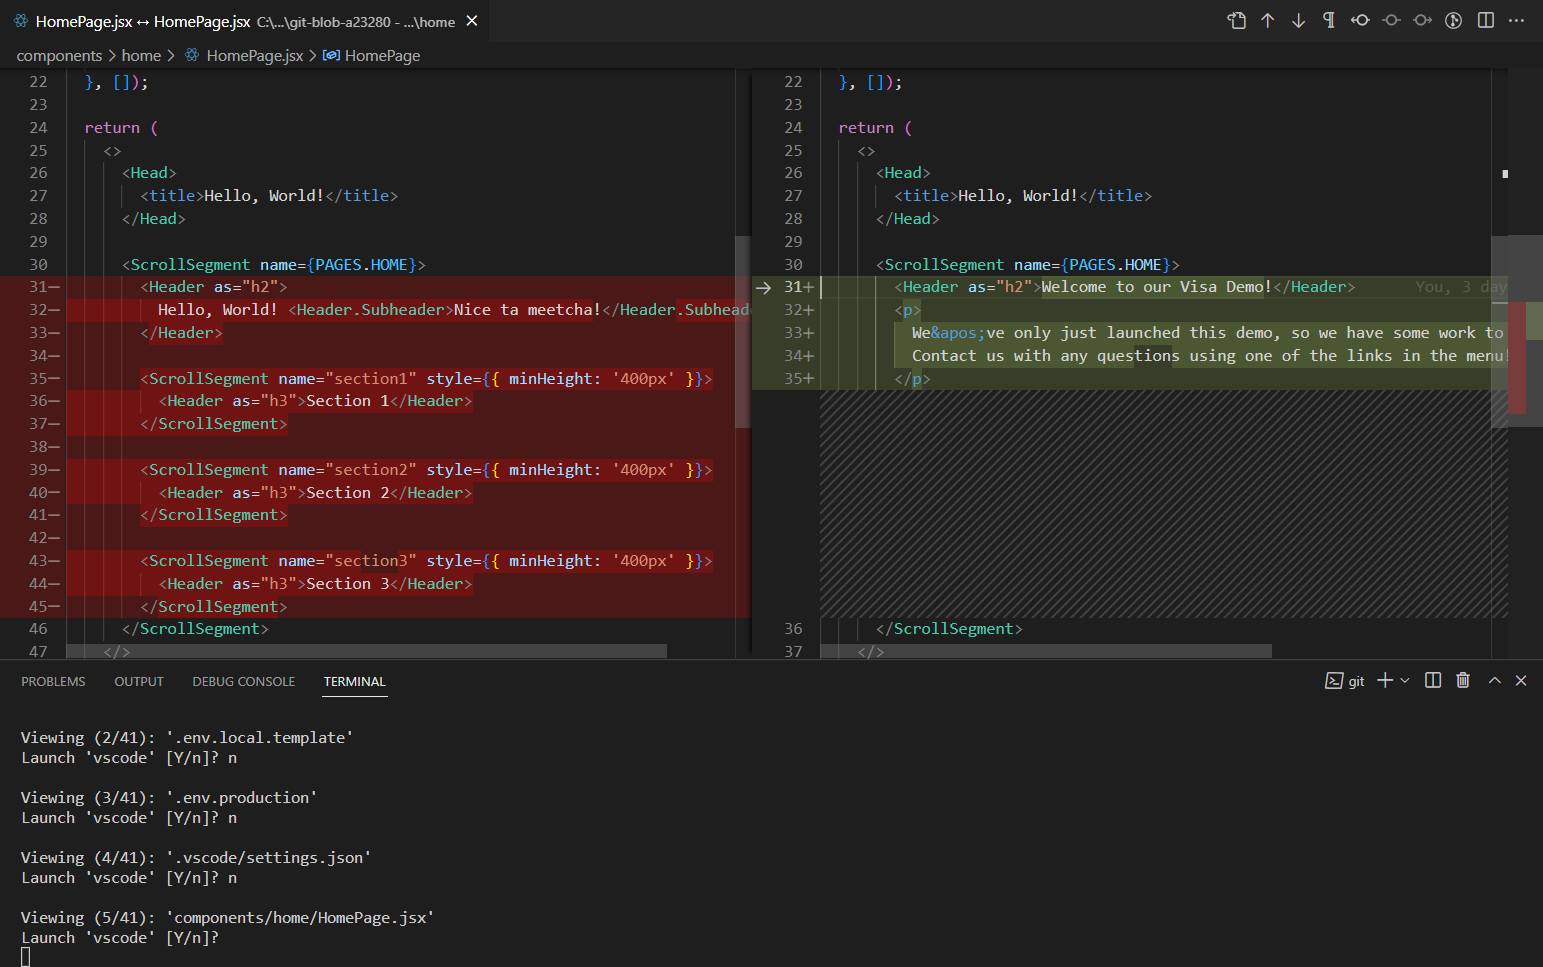
The template version is on the left, and your local version is on the right. Use the buttons in the vertical divider or edit manually as needed, then save and close the file, and your terminal will move on to the next one.
When you’re done, you’re done. See the git difftool documentation for command
line options that let you skip files or focus on specific ones.
Pro Tools Version: GitLens
GitLens is amazing for all sorts of reasons, but for our purposes here there is only one: assuming you have completed step 3 above, GitLens lets you examine the entire tree of changes between your template and your working files, and jump around as needed in order to resolve the diff.
It’s a much better experience! Here’s how to get there:
-
Install GitLens is VS Code.
-
Perform step 3 from the previous section, repeated here for your convenience. Go get the repo URL (
<template-repo-url>) and branch name (<template-remote-branch>) of the template you want to diff against. Add a new remote to that template branch your local git repo and fetch its state. Your primary remote is probably calledorigin. Let’s call this onetemplate. In your terminal:git remote add template <template-repo-url> -t <template-remote-branch> -fYou do NOT need to create a local branch.
-
GitLens will have added a bunch of stuff to your Source Control tab. Open up the Search & Compare section and click the Compare References button.
-
VS Code will ask you to choose a reference to compare. For simplicity, choose Working Tree. This selection will follow you if you switch to a different working branch.
-
VS Code will ask you to choose a reference to compare WITH. Choose your remote Template branch.
Now you will see a tree in your side panel showing you the diff by commits ahead/behind or by changed file. Click on a file to visualize the diff.
Gotcha Warning: When you click on one of those files and visualize the diff, the resulting editor will be READ-ONLY! To open an editable version, click the middle button (Open Changes with Working File) that pops up when you mouse over the file. {: .notice–warning}
Either Way
It probably bears mentioning that, whatever method you chose above, all they really provided was guidance on what changes to make in your working tree. Once you’ve made those changes, you still need to commit and push them, just like any other changes you might have made.
Also worth noting that, the farther your development has proceeded fron the original template, the uglier these diffs will be. Nothing to be done about that, it’s in the nature of a template. But as a comparison technique, either of the ones above is miles ahead of flipping back & forth between an editor and a web page.

Comments