Your project’s data needs are complex. Entity Manager simplifies the problem by encapsulating a provider-agnostic, highly opinionated approach to the single-table design pattern.
At the end of the day, though, you have to implement a specific data model against a specific database platform. This guide presents a step-by-step Typescript implementation of a realistic data model against DynamoDB, with the help of Entity Manager.
The entity-manager-demo repository contains the full implementation documented below.
An Overview
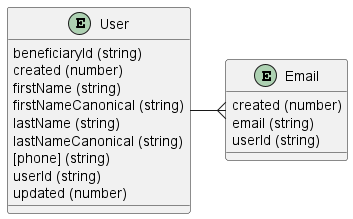
As the basis of this demonstration we will use the same data model, table design, and index structure we worked up in Evolving a NoSQL DB Schema. If you haven’t read this article yet, I recommend you do so before proceeding as it will help you understand why we settled on the design we chose.
If you just want to review the resulting design, see the Recap section at the end of that article.
While all Entity Manager entity records are technically sharded, by default each record’s shard key is an empty string, resulting in effectively unsharded data. To demonstrate Entity Manager’s ability to scale, we will configure a sharding schedule for each entity that will allow us to test both unsharded and sharded scenarios.
The details of an API implementation are beyond the scope of this demo, but we will develop the handler functions an API would call to perform the following operations against the above data model in DynamoDB using Entity Manager:
- Email entity:
- Create a new email record.
- Delete an email record.
- Retrieve a list of email records by
userId.
- User entity:
- Create a new user record.
- Retrieve a user record by
userId. - Update a user record.
- Delete a user record and associated email records.
- Retrieve a list of user records by various search criteria, including a multi-index match against both
firstNameandlastName.
We’ll also demonstrate how to leverage your Entity Manager config to generate a definition for your DynamoDB table, and how to use the entity-client-dynamodb to create this table and efficiently perform other table-level database operations in DynamoDB.
We use Vitest for the test suite and run against DynamoDB Local in a Docker container. This lets you run everything locally without touching AWS (and without costs).
DynamoDB Local Integration
There are a couple of different ways to run DynamoDB locally. See the DynamoDB Local documentation for details.
To keep things simple, this demo executes its tests against DynamoDB running in a Docker image. The only requirement is that Docker Desktop be installed & running. When you execute a test, the test suite will download the Docker image if it isn’t already present, start the container, run the tests, and then stop & delete the container.
Setting up Docker Desktop is beyond the scope of this guide, but if you’re on a Windows machine and have Chocolatey, it’s easy: run choco install docker-desktop from an admin prompt. You’ll want to restart your machine once installation completes.
If your first test execution seems to hang, check the output panel! The DynamoDB Local Docker image takes a couple of minutes to download & install, but you’ll only have to do that once. If your tests fail outright, make sure Docker Desktop is actually running!
Setting Up The Demo
After you have Docker Desktop installed & running, follow these steps:
-
Clone the
entity-manager-demorepository to your local machine. -
Install dependencies by running
npm installfrom the repository root. -
Optionally, install the Vitest Explorer VS Code extension if you prefer a GUI for tests.
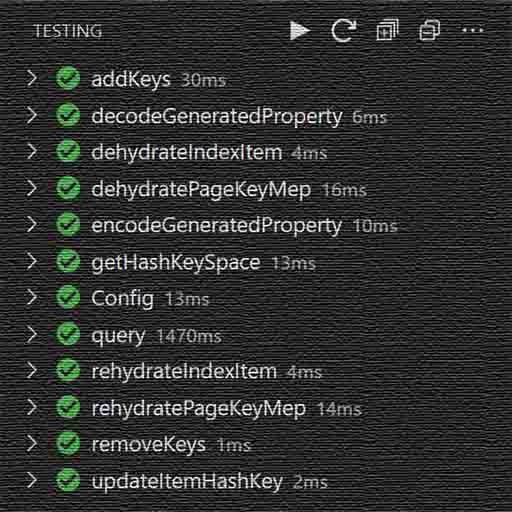
That’s it! Check your work by running:
npm run test
If all the tests pass, you’re ready to start exploring the code!
If you run into any trouble, please start a discussion and I’ll help!
Logger
All packages in the Entity Manager ecosystem perform extensive debug logging by default. This is often very useful when troubleshooting projects that leverage these packages, but it can also inject a lot of noise into the console when you’re trying to focus on your own code with its own debug logging.
Entity Manager packages also support an injected logger object. To address the noise issue, we will…
-
Alias
consoletologgerand use it everywhere we want logging in our demo. The demo will work just as well if you replaceconsolewithwinstonor some other logger of choice. -
Use the
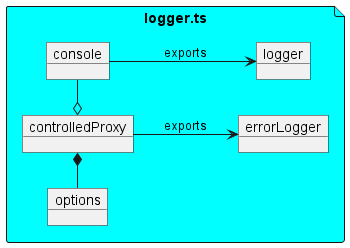
controlledProxyfunction to proxy theloggerobject and disable thedebugendpoint. When we inject the resultingerrorLoggerobject into ourEntityManagerandEntity Clientinstances, all of their internal debug logging will be suppressed.
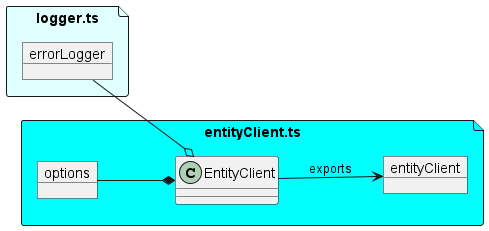
Visit src/util/logger.ts to see this code in context.
import { controlledProxy } from "@karmaniverous/controlled-proxy";

/**
 * Minimal logger wiring for the demo.
 *
 * We use console by default for simplicity. You can swap this for
 * your favorite structured logger (e.g., pino, winston) without
 * touching the rest of the codebase.
 */
export const logger = console;

/**
 * Proxy console to suppress "debug" logs from the Entity* stack while
 * keeping "error" visible. This keeps test output and examples quiet.
 *
 * Flip debug back on by changing defaultControls.debug to true.
 */
export const errorLogger = controlledProxy({
  defaultControls: { debug: false },
  target: logger,
});
The proxy keeps library-level debug logs quiet while preserving your own logs and all errors—ideal for readable demo output and CI logs.
EntityManager Configuration
EntityManager configuration.
Entity Manager is now a values‑first + schema‑first tool:
- Author a single config literal (
as const) that captures your token names, generated properties, indexes, and transcodes. - Optionally include Zod schemas for your entities via
entitiesSchema(base/domain fields only). - Call
createEntityManager(config, logger?). The manager infers types from values (and schemas) and validates the configuration at runtime.
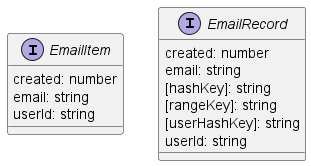
In this demo, Email and User schemas live alongside their types:
// src/entity-manager/Email.ts
import type { EntityClientRecordByToken } from "@karmaniverous/entity-manager";
import { z } from "zod";

import { entityClient } from "../entity-manager/entityClient";

/**
 * Email domain schema (base fields only).
 */
export const emailSchema = z.object({
  created: z.number(),
  email: z.string(),
  userId: z.string(),
});

export type EmailItem = z.infer<typeof emailSchema>;
export type EmailRecord = EntityClientRecordByToken<
  typeof entityClient,
  "email"
>;
// src/entity-manager/User.ts
import type { EntityClientRecordByToken } from "@karmaniverous/entity-manager";
import { z } from "zod";
import { entityClient } from "../entity-manager/entityClient";
/**
* User domain schema (base fields only).
*/
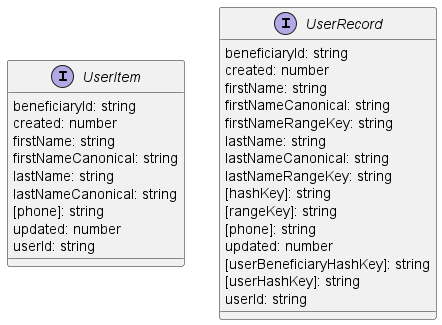
export const userSchema = z.object({
beneficiaryId: z.string(),
created: z.number(),
firstName: z.string(),
firstNameCanonical: z.string(),
lastName: z.string(),
lastNameCanonical: z.string(),
phone: z.string().optional(),
updated: z.number(),
userId: z.string(),
});
export type UserItem = z.infer<typeof userSchema>;
export type UserRecord = EntityClientRecordByToken<
typeof entityClient,
"user"
>;
A few important points:
- Schemas declare only domain fields. Generated/global keys (e.g.,
hashKey,rangeKey, or range-key composites) are layered by Entity Manager based on the config. EmailItemandUserItemare the shapes your API handlers work with.- When you read through the adapter you’ll get “records” (storage-facing shapes that include keys). Use
entityManager.removeKeys()when you want to return pure domain items to callers.
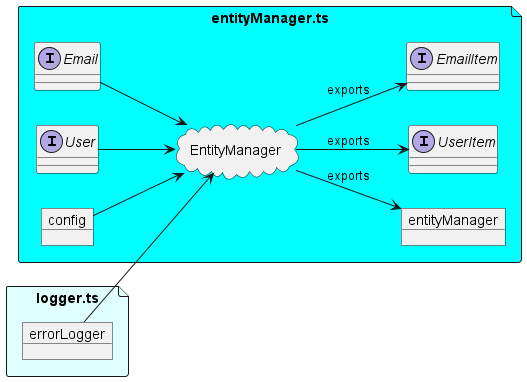
The manager itself is configured in src/entity-manager/entityManager.ts. Here is an excerpt, with commentary:
import type { ConfigInput } from "@karmaniverous/entity-manager";
import { createEntityManager } from "@karmaniverous/entity-manager";
import { defaultTranscodes } from "@karmaniverous/entity-tools";

import { errorLogger } from "../util/logger";
import { emailSchema } from "./Email";
import { userSchema } from "./User";

// Use "now" as a sharding breakpoint so historical items are unsharded,
// while newly-created items demonstrate sharding behavior in tests.
const now = Date.now();

const config = {
  hashKey: "hashKey" as const,
  rangeKey: "rangeKey" as const,

  // Drive domain shapes from Zod schemas (base fields only).
  entitiesSchema: {
    email: emailSchema,
    user: userSchema,
  } as const,

  // Entities and per-entity sharding schedule.
  entities: {
    email: {
      uniqueProperty: "email",
      timestampProperty: "created",
      shardBumps: [{ timestamp: now, charBits: 2, chars: 1 }],
    },
    user: {
      uniqueProperty: "userId",
      timestampProperty: "created",
      shardBumps: [{ timestamp: now, charBits: 2, chars: 1 }],
    },
  },

  // Generated properties power indexes and alternate hash keys.
  generatedProperties: {
    sharded: {
      beneficiaryHashKey: ["beneficiaryId"] as const,
      userHashKey: ["userId"] as const,
    } as const,
    unsharded: {
      firstNameRangeKey: [
        "firstNameCanonical",
        "lastNameCanonical",
        "created",
      ] as const,
      lastNameRangeKey: [
        "lastNameCanonical",
        "firstNameCanonical",
        "created",
      ] as const,
    } as const,
  } as const,

  // Index tokens exactly match those used by the handlers.
  indexes: {
    created: {
      hashKey: "hashKey",
      rangeKey: "created",
      projections: [],
    },
    firstName: {
      hashKey: "hashKey",
      rangeKey: "firstNameRangeKey",
      projections: [],
    },
    lastName: {
      hashKey: "hashKey",
      rangeKey: "lastNameRangeKey",
      projections: [],
    },
    phone: {
      hashKey: "hashKey",
      rangeKey: "phone",
      projections: [],
    },
    updated: {
      hashKey: "hashKey",
      rangeKey: "updated",
      projections: [],
    },
    userBeneficiaryCreated: {
      hashKey: "beneficiaryHashKey",
      rangeKey: "created",
      projections: [],
    },
    userBeneficiaryFirstName: {
      hashKey: "beneficiaryHashKey",
      rangeKey: "firstNameRangeKey",
      projections: [],
    },
    userBeneficiaryLastName: {
      hashKey: "beneficiaryHashKey",
      rangeKey: "lastNameRangeKey",
      projections: [],
    },
    userBeneficiaryPhone: {
      hashKey: "beneficiaryHashKey",
      rangeKey: "phone",
      projections: [],
    },
    userBeneficiaryUpdated: {
      hashKey: "beneficiaryHashKey",
      rangeKey: "updated",
      projections: [],
    },
    userCreated: {
      hashKey: "userHashKey",
      rangeKey: "created",
      projections: [],
    },
  } as const,

  // Map domain fields to transcoding strategies for generated tokens.
  propertyTranscodes: {
    beneficiaryId: "string",
    created: "timestamp",
    email: "string",
    firstNameCanonical: "string",
    lastNameCanonical: "string",
    phone: "string",
    updated: "timestamp",
    userId: "string",
  },

  // Keep default transcoding behavior.
  transcodes: defaultTranscodes,
} satisfies ConfigInput;

export const entityManager = createEntityManager(
  config,
  errorLogger
);
This values‑first literal preserves tokens such as hashKey, rangeKey, and index names exactly, so you get strong, token‑aware inference across the stack without generics or casts.
EntityClient Configuration
EntityClient configuration.
The EntityClient class combines the AWS SDK’s DynamoDB client and document layer with a few high‑level helpers (batched writes, table lifecycle, etc.) and a typed query builder.
In this demo we wire it to our manager and point it at DynamoDB Local:
// src/entity-manager/entityClient.ts
import { EntityClient } from "@karmaniverous/entity-client-dynamodb";

import { errorLogger } from "../util/logger";
import { entityManager } from "./entityManager";

export const entityClient = new EntityClient({
  credentials: {
    accessKeyId: "fakeAccessKeyId",
    secretAccessKey: "fakeSecretAccessKey",
  },
  endpoint: "http://localhost:8000", // DynamoDB Local
  entityManager, // typed — keeps reads/writes in sync
  logger: errorLogger,
  region: "local",
  tableName: "UserService",
});
Two things to notice:
- We pass the
entityManagerso token‑aware helpers (addKeys, removeKeys, getPrimaryKey) and typed reads/writes use the same configuration. - We keep the endpoint local and credentials fake—DynamoDB Local doesn’t need real AWS credentials.
It’s also common to generate a table definition from the manager for local/dev:
import { generateTableDefinition } from "@karmaniverous/entity-client-dynamodb";

await entityClient.createTable({
  ...generateTableDefinition(entityClient.entityManager),
  BillingMode: "PAY_PER_REQUEST",
});
The generator converts your config’s indexes and tokens into DynamoDB KeySchema, GSI definitions, and attribute types.
Endpoint Handlers
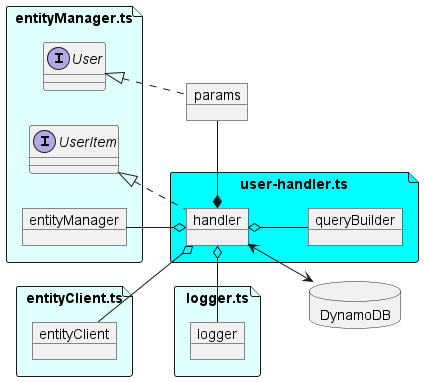
Every handler follows the same pattern:
- Accept/validate params in domain shape (e.g.,
UserItem,EmailItem). - Use Entity Manager helpers to materialize or strip generated/global keys.
- Delegate reads/writes to EntityClient.
- For searches, use the QueryBuilder to compose per‑index conditions, then ask the manager to orchestrate a cross‑shard, multi‑index query.
Below are small, focused examples with explanations.
Email Entity
Create Email
// src/handlers/email/createEmail.ts (excerpt)
export const createEmail = async (
  params: CreateEmailParams // EmailItem with 'created' optional
): Promise<EmailItem> => {
  const entityToken = "email";

  // Extract & normalize for uniqueness (case-insensitive)
  const { email, userId, ...rest } = params;
  const normalizedEmail = email.toLowerCase();

  // Guard against duplicates — uniqueProperty is 'email'
  if ((await readEmail(normalizedEmail)).length)
    throw new Error("Email record already exists.");

  // Create the domain item
  const now = Date.now();
  const item: EmailItem = {
    ...rest,
    created: now,
    email: normalizedEmail,
    userId,
  };

  // Add generated/global keys and persist
  const record = entityClient.entityManager.addKeys(
    entityToken,
    item
  );
  await entityClient.putItem(record);

  return item; // return the domain item shape
};
Explanation:
- We normalize the email address to enforce case‑insensitive uniqueness and check for pre‑existence using the
readEmailhelper. addKeys('email', item)computes the storage‑facing record with global keys and any generated tokens, so we can write it withputItem.- The handler returns the domain
EmailItemso callers don’t see storage keys.
Read Email
// src/handlers/email/readEmail.ts (excerpt)
export function readEmail(
  email: EmailItem["email"],
  keepKeys: true
): Promise<EmailRecord[]>; // records with keys
export function readEmail(
  email: EmailItem["email"],
  keepKeys?: false
): Promise<EmailItem[]>; // domain items (keys removed)
export async function readEmail(
  email: EmailItem["email"],
  keepKeys = false
) {
  const entityToken = "email" as const;

  const keys = entityClient.entityManager.getPrimaryKey(
    entityToken,
    {
      email: email.toLowerCase(),
    }
  );

  const { items } = await entityClient.getItems(entityToken, keys);
  if (keepKeys) return items;

  return entityClient.entityManager.removeKeys(entityToken, items);
}
Explanation:
- Overloads give you a choice: storage records (for internal flows) or pure domain items (for API responses).
- Token‑aware
getPrimaryKeyandgetItemskeep the code short and strongly typed. removeKeysstrips generated/global keys from records to return domain items.
Delete Email
// src/handlers/email/deleteEmail.ts (excerpt)
export const deleteEmail = async (
  email: EmailItem["email"]
): Promise<void> => {
  const entityToken = "email";

  // Read first → derive exact primary keys → delete
  const items = await readEmail(email, true);
  if (!items.length) throw new Error("Email records do not exist.");

  const keys = entityClient.entityManager.getPrimaryKey(
    entityToken,
    items
  );
  await entityClient.deleteItems(keys);
};
Explanation:
- Deleting by unique email is a two‑step: read to get exact keys, then delete. This prevents accidental deletion by partial keys and confirms existence.
Search Emails
// src/handlers/email/searchEmails.ts (excerpt)
export const searchEmails = async (params: SearchEmailsParams) => {
  const { createdFrom, createdTo, pageKeyMap, sortDesc, userId } =
    params;
  const entityToken = "email";

  // Hash-key token varies by scope: global vs user-scoped
  const hashKeyToken = userId ? "userHashKey" : "hashKey";

  // CF literal narrows index tokens (and page keys) at compile time
  const cf = {
    indexes: {
      created: { hashKey: "hashKey", rangeKey: "created" },
      userCreated: { hashKey: "userHashKey", rangeKey: "created" },
    },
  } as const;

  // Pick the specific index token given the scope
  const indexToken =
    hashKeyToken === "userHashKey" ? "userCreated" : "created";

  // Compose and execute a cross-shard query
  const result = await createQueryBuilder({
    entityClient,
    entityToken,
    hashKeyToken,
    pageKeyMap,
    cf,
  })
    .addRangeKeyCondition(indexToken, {
      property: "created",
      operator: "between",
      value: { from: createdFrom, to: createdTo },
    })
    .query({
      item: userId ? { userId } : {},
      sortOrder: [{ property: "created", desc: sortDesc }],
      timestampFrom: createdFrom,
      timestampTo: createdTo,
    });

  if (!result.items.length) return result;

  // Enrich items then sort by a domain property
  const keys = entityClient.entityManager.getPrimaryKey(
    entityToken,
    result.items
  );
  const { items } = await entityClient.getItems(keys);
  result.items = entityClient.entityManager.removeKeys(
    entityToken,
    sort(items, [{ property: "created", desc: sortDesc }])
  );
  return result;
};
Explanation:
- We choose the hash‑key token based on whether the search is user‑scoped or global, then use a tiny CF literal to drive index‑token and page‑key typing.
- The manager executes throttled, parallel shard queries to cover the time window. It returns
{ items, count, pageKeyMap }. - We enrich and sort on a domain field (
created) and return domain items (keys removed). ThepageKeyMapis a single compact string you pass back to fetch the next page.
User Entity
Create User
// src/handlers/user/createUser.ts (excerpt)
export const createUser = async (
  params: CreateUserParams
): Promise<UserItem> => {
  const entityToken = "user";
  const { firstName, lastName, userId, ...rest } = params;

  // Guard: if a userId is provided and exists, fail fast
  if (userId && (await readUser(userId)).length)
    throw new Error("Email record already exists.");

  // Canonicalize to enable normalized search
  const now = Date.now();
  const item: UserItem = {
    ...rest,
    created: now,
    firstName,
    firstNameCanonical: normstr(firstName) ?? "",
    lastName,
    lastNameCanonical: normstr(lastName) ?? "",
    updated: now,
    userId: userId ?? nanoid(),
  };

  // Add keys & persist; return domain item
  const record = entityClient.entityManager.addKeys(
    entityToken,
    item
  );
  await entityClient.putItem(record);
  return item;
};
Explanation:
normstrbuilds canonical forms for case/whitespace/diacritic‑insensitive search.- We generate or reuse
userId, set timestamps, materialize keys withaddKeys, and persist.
Read User
// src/handlers/user/readUser.ts (excerpt)
export function readUser(
  userId: UserItem["userId"],
  keepKeys: true
): Promise<UserRecord[]>; // records with keys
export function readUser(
  userId: UserItem["userId"],
  keepKeys?: false
): Promise<UserItem[]>; // domain items (keys removed)
export async function readUser(
  userId: UserItem["userId"],
  keepKeys = false
) {
  const entityToken = "user" as const;

  const keys = entityClient.entityManager.getPrimaryKey(
    entityToken,
    {
      userId,
    }
  );
  const { items } = await entityClient.getItems(entityToken, keys);
  if (keepKeys) return items;

  return entityClient.entityManager.removeKeys(entityToken, items);
}
Explanation:
- Overloads mirror the email reader. Token‑aware helpers keep the function tiny and strongly typed.
Update User
// src/handlers/user/updateUser.ts (excerpt)
export const updateUser = async (
  data: MakeUpdatable<UserItem, "userId">
): Promise<UserItem[]> => {
  const entityToken = "user";

  // Read domain items to update
  const { firstName, lastName, userId, ...rest } = data;
  const items = await readUser(userId);
  if (!items.length) throw new Error("User records do not exist.");

  // Shallow update semantics: undefined ignored; null assigned (and removed)
  const updatedItems = items.map((item) =>
    updateRecord(item, {
      firstName,
      firstNameCanonical: normstr(firstName),
      lastName,
      lastNameCanonical: normstr(lastName),
      updated: Date.now(),
      ...rest,
    })
  );

  // Re-materialize keys and persist the records
  const updatedRecords = entityClient.entityManager.addKeys(
    entityToken,
    updatedItems
  );
  await entityClient.putItems(updatedRecords);

  return updatedItems; // domain items
};
Explanation:
updateRecordimplements safe shallow merges with predictable semantics—ideal for HTTP PATCH‑style updates.- We re‑materialize keys from the updated domain items and write them back in batch.
Delete User
// src/handlers/user/deleteUser.ts (excerpt)
export const deleteUser = async (
  userId: UserItem["userId"]
): Promise<void> => {
  const entityToken = "user";

  // Read first → derive exact primary keys → delete
  const items = await readUser(userId, true);
  if (!items.length) throw new Error("User records do not exist.");

  const keys = entityClient.entityManager.getPrimaryKey(
    entityToken,
    items
  );
  await entityClient.deleteItems(keys);
};
Explanation:
- Same pattern as email delete: read records with keys; derive exact primary keys; delete.
Search Users
This is the most interesting flow: multiple scopes (global or beneficiary‑scoped), multiple indexes (created/updated/name/phone), and result sorting on domain properties. The code mirrors the design from the “Evolving a NoSQL Schema” article.
// src/handlers/user/searchUsers.ts (excerpt)
export const searchUsers = async (params: SearchUsersParams) => {
  const entityToken = "user";

  // Normalize user-supplied filters
  const {
    beneficiaryId,
    createdFrom,
    createdTo,
    pageKeyMap,
    sortDesc,
    updatedFrom,
    updatedTo,
  } = params;
  const name = normstr(params.name);
  const phone = normstr(params.phone);

  // Choose a default sort order consistent with supplied filters
  const sortOrder: NonNullable<typeof params.sortOrder> =
    params.sortOrder ??
    (name
      ? "name"
      : updatedFrom || updatedTo
      ? "updated"
      : "created");

  // Switch between global and beneficiary-scoped hash keys
  const hashKeyToken = beneficiaryId
    ? "beneficiaryHashKey"
    : "hashKey";

  // Derive which index range-keys we need given supplied filters
  const rangeKeyTokens = phone
    ? ["phone"]
    : sortOrder === "created"
    ? ["created"]
    : sortOrder === "name"
    ? name
      ? ["firstNameRangeKey", "lastNameRangeKey"]
      : ["lastNameRangeKey"]
    : ["updated"];

  // CF literal constrains index tokens for typing and narrows page keys
  const cf = {
    indexes: {
      created: { hashKey: "hashKey", rangeKey: "created" },
      firstName: {
        hashKey: "hashKey",
        rangeKey: "firstNameRangeKey",
      },
      lastName: {
        hashKey: "hashKey",
        rangeKey: "lastNameRangeKey",
      },
      phone: { hashKey: "hashKey", rangeKey: "phone" },
      updated: { hashKey: "hashKey", rangeKey: "updated" },
      userBeneficiaryCreated: {
        hashKey: "beneficiaryHashKey",
        rangeKey: "created",
      },
      userBeneficiaryFirstName: {
        hashKey: "beneficiaryHashKey",
        rangeKey: "firstNameRangeKey",
      },
      userBeneficiaryLastName: {
        hashKey: "beneficiaryHashKey",
        rangeKey: "lastNameRangeKey",
      },
      userBeneficiaryPhone: {
        hashKey: "beneficiaryHashKey",
        rangeKey: "phone",
      },
      userBeneficiaryUpdated: {
        hashKey: "beneficiaryHashKey",
        rangeKey: "updated",
      },
      userCreated: { hashKey: "userHashKey", rangeKey: "created" },
    },
  } as const;

  // Route map from (hashKeyToken, rangeKeyToken) → index token
  const route = {
    hashKey: {
      created: "created",
      firstNameRangeKey: "firstName",
      lastNameRangeKey: "lastName",
      phone: "phone",
      updated: "updated",
    },
    beneficiaryHashKey: {
      created: "userBeneficiaryCreated",
      firstNameRangeKey: "userBeneficiaryFirstName",
      lastNameRangeKey: "userBeneficiaryLastName",
      phone: "userBeneficiaryPhone",
      updated: "userBeneficiaryUpdated",
    },
  } as const;

  // Start a typed builder; pageKeyMap lets us resume paging
  let queryBuilder = createQueryBuilder({
    entityClient,
    entityToken,
    hashKeyToken,
    pageKeyMap,
    cf,
  });

  // Add per-index range & filter conditions
  for (const rangeKeyToken of rangeKeyTokens) {
    const indexToken =
      route[hashKeyToken][
        rangeKeyToken as keyof (typeof route)["hashKey"]
      ];

    if (rangeKeyToken === "created")
      queryBuilder = queryBuilder.addRangeKeyCondition(indexToken, {
        property: "created",
        operator: "between",
        value: { from: createdFrom, to: createdTo },
      });
    else if (rangeKeyToken === "firstNameRangeKey")
      queryBuilder = queryBuilder.addRangeKeyCondition(indexToken, {
        property: "firstNameRangeKey",
        operator: "begins_with",
        value: entityClient.entityManager.encodeGeneratedProperty(
          "firstNameRangeKey",
          { firstNameCanonical: name }
        ),
      });
    else if (rangeKeyToken === "lastNameRangeKey")
      queryBuilder = queryBuilder.addRangeKeyCondition(indexToken, {
        property: "lastNameRangeKey",
        operator: "begins_with",
        value: entityClient.entityManager.encodeGeneratedProperty(
          "lastNameRangeKey",
          { lastNameCanonical: name }
        ),
      });
    else if (rangeKeyToken === "phone")
      queryBuilder = queryBuilder.addRangeKeyCondition(indexToken, {
        property: "phone",
        operator: "begins_with",
        value: phone,
      });
    else if (rangeKeyToken === "updated")
      queryBuilder = queryBuilder.addRangeKeyCondition(indexToken, {
        property: "updated",
        operator: "between",
        value: { from: updatedFrom, to: updatedTo },
      });
    else
      throw new Error(
        `Unsupported range key token '${rangeKeyToken}'.`
      );

    // Filters for dimensions not covered by the range-key choice
    if ((createdFrom || createdTo) && rangeKeyToken !== "created")
      queryBuilder = queryBuilder.addFilterCondition(indexToken, {
        property: "created",
        operator: "between",
        value: { from: createdFrom, to: createdTo },
      });

    if (
      name &&
      !["firstNameRangeKey", "lastNameRangeKey"].includes(
        rangeKeyToken
      )
    )
      queryBuilder = queryBuilder.addFilterCondition(indexToken, {
        operator: "or",
        conditions: [
          {
            property: "firstNameCanonical",
            operator: "begins_with",
            value: name,
          },
          {
            property: "lastNameCanonical",
            operator: "begins_with",
            value: name,
          },
        ],
      });

    if ((updatedFrom || updatedTo) && rangeKeyToken !== "updated")
      queryBuilder = queryBuilder.addFilterCondition(indexToken, {
        property: "updated",
        operator: "between",
        value: { from: updatedFrom, to: updatedTo },
      });
  }

  // Execute the cross-shard query; empty item for global scope
  const result = await queryBuilder.query({
    item: beneficiaryId ? { beneficiaryId } : {},
    timestampFrom: createdFrom,
    timestampTo: createdTo,
  });

  if (!result.items.length) return result;

  // Enrich and sort on domain properties
  const keys = entityClient.entityManager.getPrimaryKey(
    entityToken,
    result.items
  );
  const { items } = await entityClient.getItems(keys);

  const sortedItems = sort(items, [
    {
      property:
        sortOrder === "name" ? "lastNameCanonical" : sortOrder,
      desc: sortDesc,
    },
  ]);

  result.items = entityClient.entityManager.removeKeys(
    entityToken,
    sortedItems
  );
  return result;
};
Explanation:
- We select the hash‑key token based on whether the search is beneficiary‑scoped or global. A small CF literal constrains valid index tokens and narrows page‑key typing at compile time.
- Range‑key conditions change based on sort dimension (time, name, or phone). We complement them with filter conditions for other dimensions as needed.
- The manager fans out throttled queries across the effective shard space and merges results with dedupe and paging; we then enrich and sort on domain properties for presentation.
A note on tests (Vitest)
The test suite sets up DynamoDB Local, creates the table from your config, exercises CRUD and search, and tears down the container.
// src/entity-manager/entityClient.test.ts (excerpt)
import { ListTablesCommand } from "@aws-sdk/client-dynamodb";
import {
  dynamoDbLocalReady,
  setupDynamoDbLocal,
  teardownDynamoDbLocal,
} from "@karmaniverous/dynamodb-local";
import { generateTableDefinition } from "@karmaniverous/entity-client-dynamodb";

import { env } from "../env";
import { entityClient } from "./entityClient";

describe("entityClient", () => {
  beforeAll(async () => {
    await setupDynamoDbLocal(env.dynamoDbLocalPort);
    await dynamoDbLocalReady(entityClient.client);
  });

  afterAll(async () => {
    await teardownDynamoDbLocal();
  });

  it("creates & deletes user table", async () => {
    await entityClient.createTable({
      ...generateTableDefinition(entityClient.entityManager),
      BillingMode: "PAY_PER_REQUEST",
    });

    let tables = await entityClient.client.send(
      new ListTablesCommand()
    );
    expect(tables.TableNames).to.deep.equal([
      entityClient.tableName,
    ]);

    await entityClient.deleteTable();
    tables = await entityClient.client.send(
      new ListTablesCommand()
    );
    expect(tables.TableNames).to.deep.equal([]);
  });
});
This provides a fast, repeatable environment to validate both orchestration (manager/query) and adapter wiring (DynamoDB operations) with no cloud dependencies.
That’s the full walkthrough of the current demo:
- Value‑first + schema‑first Entity Manager configuration.
- DynamoDB adapter wiring with typed CRUD and table lifecycle.
- Token‑aware reads/writes and index‑aware cross‑shard queries.
- Concise handlers that are easy to test and reason about.
If you have questions or ideas for improving the demo, join the discussion!