React Component NPM Package Template

You wrote a sweet React component! Releasing it on NPM seems like the obvious next step. Right?
Try it. Not as easy to do from scratch as you might think.
I just completely refactored this template but haven’t yet updated this documentaion. Everything works beautifully, and for a gist of the changes see the very similar NPM Package Template. I’ll bring this page in sync with the changes soon!
So here’s a plug-and-play react component NPM package template that offers the following features:
-
Support for the latest ES6 + JSX goodies with
eslintuber alles. -
Automated
lodashcherry-picking withbabel-plugin-lodash. -
Front & back-end testing with
mocha,chai, and the React Testing Library. Includes examples and a sweet testing console! -
Code formatting at every save & paste with
prettier. -
Automated documentation of your API with
jsdoc-to-markdownand assembly of your README withconcat-md. -
One-button release to GitHub & publish to NPM with
release-it.
See it on GitHub! Clone the Repo!
If you want to create a non-React NPM package, try my regular NPM Package Template instead!
Setting Up Your Dev Environment
Use VS Code as your code editor! Not an absolute requirement, but you’ll be glad you did.
-
Click here to generate a new repository from this template.
-
Clone the new repository to your local machine.
-
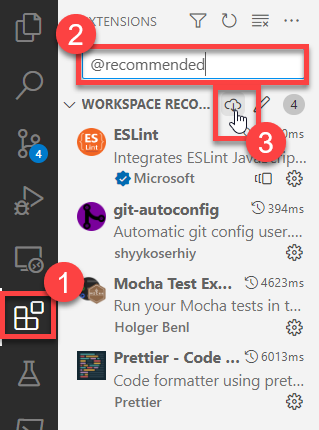
VS Code will ask to install a bunch of recommended extensions. Accept all of them. If you miss this prompt, follow these steps:
- Open the VS Code Extensions tab
- Enter
@recommendedinto the search box -
Click the Download link.

-
Zero the package version and install dependencies by running these commands:
npm version 0.0.0
npm install
This may produce an audit report. See Vulnerabilities below for more info.
-
Run your tests from the command line:
npm run test

# Component
#   missing testid
#     ✔ renders
#   with testid
#     ✔ renders
#     ✔ is unaffected by click
#
# 3 passing (99ms)
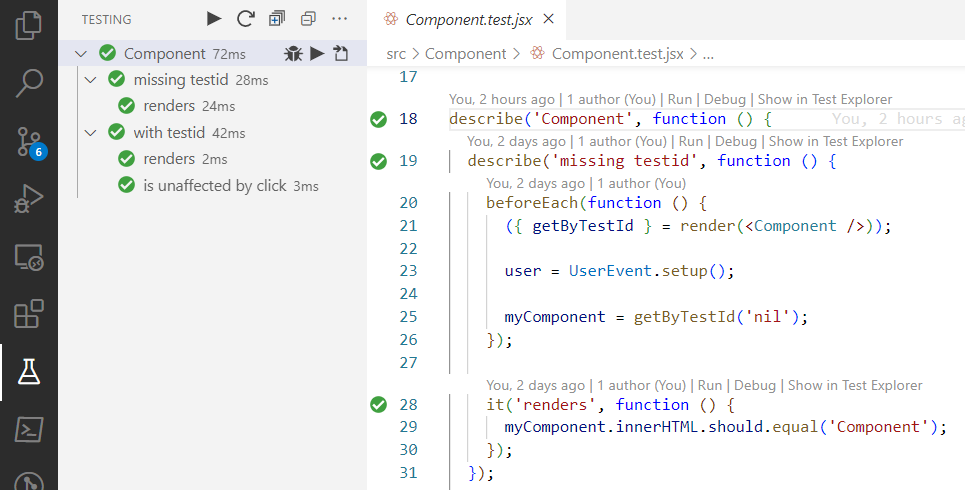
If you installed the VS Code extensions referenced above, use the
Testingpanel to visualize & run your unit tests.
Create Local Environment Variable File
Look for
.env.local.template
in your project directory. Copy this file and remove the .template extension
from the copy.
Do not simply rename this file! Anybody who pulls your repo will need this template to create the same file in his own local environment.
Connect to GitHub
This template supports automated release management with
release-it.
If you use GitHub, create a
Personal Access Token
(release-it only needs “repo” access; no “admin” or other scopes). Add it as
the value of GITHUB_TOKEN in .env.local.
If you use GitLab, follow these instructions and place your token in the same file.
For other release control systems, consult the
release-it README.
You can now create a release at GitHub and optionally publish it to NPM with this command:
npm run release
Vulnerabilities
At the time of this writing, running npm install will generate the following
vulnerability warning:
6 vulnerabilities (3 high, 3 critical)
If you run npm audit, you will find that all of these vulnerabilities relate
to the following dev dependencies, all of which are to do with docs generation:
npm list underscore

# @karmaniverous/npm-package-template@0.5.1-0
# ├─┬ concat-md@0.5.0
# │ └─┬ doctoc@1.4.0
# │   └── underscore@1.8.3
# └─┬ jsdoc-to-markdown@8.0.0
#   └─┬ jsdoc-api@8.0.0
#     └─┬ jsdoc@4.0.0
#       └── underscore@1.13.6

npm list trim

# @karmaniverous/npm-package-template@0.5.1-0
# └─┬ concat-md@0.5.0
#   └─┬ doctoc@1.4.0
#     └─┬ @textlint/markdown-to-ast@6.0.9
#       └─┬ remark-parse@5.0.0
#         └── trim@0.0.1
NPM Scripts
| Script | Description |
|---|---|
npm run test |
Runs all unit tests from the command line. |
npm run build |
Builds the project into the lib directory. |
npm run doc |
Builds the README file from the doc directory. |
npm run package |
Runs test, build, and doc to exercise your full packaging process. |
npm run release |
Packages your code, creates a GitHub release, and publishes your code to NPM. |
Common Tasks
Develop Package Exports
All custom package code lives in the
src
directory. Structure the contents of this directory however you like.
All package exports come together in src/index.jsx. You can
cherry-pick from your own source and organize your exports however you like. You
can even re-export imports
from other packages!
Do not move or rename src/index.jsx or your build will break.
Create & Run Unit Tests
By default, this template supports
mocha tests using the
chai assertion library. The included
sample tests express the should
assertion syntax.
The default configuration will recognize any file as a test file that…
- has
.test.just before its file name extension (i.e.example.test.js). - is not located in the
node_modulesorlibdirectories.
The sample code packages tests next to the source code they exercise. If you
prefer to segregate your tests into a directory outside
src
(e.g. test), that will work as well.
Either way, all test files meeting the above conditions will be excluded from the build.
To enable mocha-specific linting in your test files, add the following
directive at the top of every test file:
/* eslint-env mocha */
The recommended
Mocha Test Explorer
extension will suface all of your tests into a sidebar console, nested to
reflect your describe hierarchy. It will also decorate your test source code
with test running and status reporting controls.

Test Your Build
Back-End Tests
TODO
Front-End Tests
This template supports front-end React component testing using the React Testing Library (RTL). This library allows your tests to interact with your component in a headless browser environment.
See
Component.test.jsx
for a simple example, and visit the
RTL documentation
for more info!
Generate Documentation
TODO
Integration-Test Your Package
A React component only makes sense when embedded in a React application.
To package your code and add it directly to your local development environment as a global package, WITHOUT publishing it first to NPM, run these commands:
npm run package
npm link
You can now import your package assets into your React application like this:
import Component from "@karmaniverous/react-component-npm-package-template"; // default export
import { useComponent } from "@karmaniverous/react-component-npm-package-template"; // named export
When you’re finished, clean up your global environment by unlinking your package:
npm unlink -g @karmaniverous/react-component-npm-package-template
Create & Publish a Release
Before you can publish a package to NPM, you’ll need to set up an NPM account.
Package Scope & Access
Your NPM user name is a scope. If you create an organization, its unique organization name is also a scope.
Unscoped packages have names like
lodash. An unscoped package name must
be unique across NPM.
Scoped packages have names like
@karmaniverous/serify-deserify.
@karmaniverous in this case is the scope. A scoped package name only needs to
be unique within its scope.
NPM packages may be public or private. A public package can be seen and used by anyone. A private package can only be seen & used by your collaborators or other users with access to your organization scope.
Only scoped packages can be private. Only paid NPM accounts can create private packages.
Even if you are only creating public packages, it is a good idea to create scoped packages because it groups them logically and gives you much more flexibility in naming them.
Click here for more info about NPM package scope & access.
Configuring package.json
When you publish an NPM package, NPM gets most of its info from your
package.json
file.
Set the following values in
package.json,
using the template file as an example.
This info is critical. You can’t publish your package properly without it:
-
name– The desired package name on NPM. Include scope if relevant. See Package Scope & Access for more info. -
version- Your package version. Uses semantic versioning. Set this initially to0.0.0and the template’s release process will manage it from there. -
publishConfig.access-restrictedfor private packages, otherwisepublic. See Package Scope & Access for more info. -
repository.url- GitHub repository URL.
This info is important but you can always update it in the next release:
-
author- Your name, however you’d like it to appear. -
bugs.url- A URL for users to report bugs. By default, use the issues page of your GitHub repo. -
description- A text description of your package. Will be used as the META description of your NPM package page, so keep it under 160 chars. -
homepage- The main web page of your project. By default, use your GitHub repo’s README link. -
keywords- An array of strings that will appear as tags on the NPM package page. -
license- The license associated with your package. See this list of valid license identifiers.
Generating the Release
Before you begin, ensure you have committed all changes to your working branch.
Run this command:
npm run package
This will run all of your tests, generate all of your documentation, and create your build. If there are any issues, fix them. If you make any changes, commit them.
Now run this command:
npm run release
This will generate your package again, just to validate there are no more changes. You will then be asked to select a release increment. Otherwise accept all defaults.
Your release will be generated on GitHub and published to NPM.
Note that if you have configured Two-Factor Authentication at NPM you will be asked to enter a One-Time Password (OTP).
Add other release-it
options after --- (Windows) or -- (Mac/Linux). For example, to specify a
patch release, and accept all defaults with no user interaction, run this
command:
# Windows only.
npm run release --- patch --ci

# Mac/Linux.
npm run release -- patch --ci
See the release-it README
for more info on available options.
Integrate a Template Update
Follow these instructions.


Leave a comment